The First-Day Rainbow Pencil Butterfly Suncatcher transforms as you create it, capturing the sunlight beautifully. This vibrant craft project is perfect for adding a bit of color to your home while indulging in a fun DIY activity. You may also find Crystal Rainbow Butterfly Tree Garden Decor useful.
Start with the classic butterfly shape, and you will see how the use of clear contact paper and various colorful materials creates a stunning visual effect. You’ll notice the colors pop and blend while working, particularly when you fill in the wings with different textures, which is where the fun really begins. You may also find Iridescent Rainbow Ghost Window Suncatcher useful.
Materials
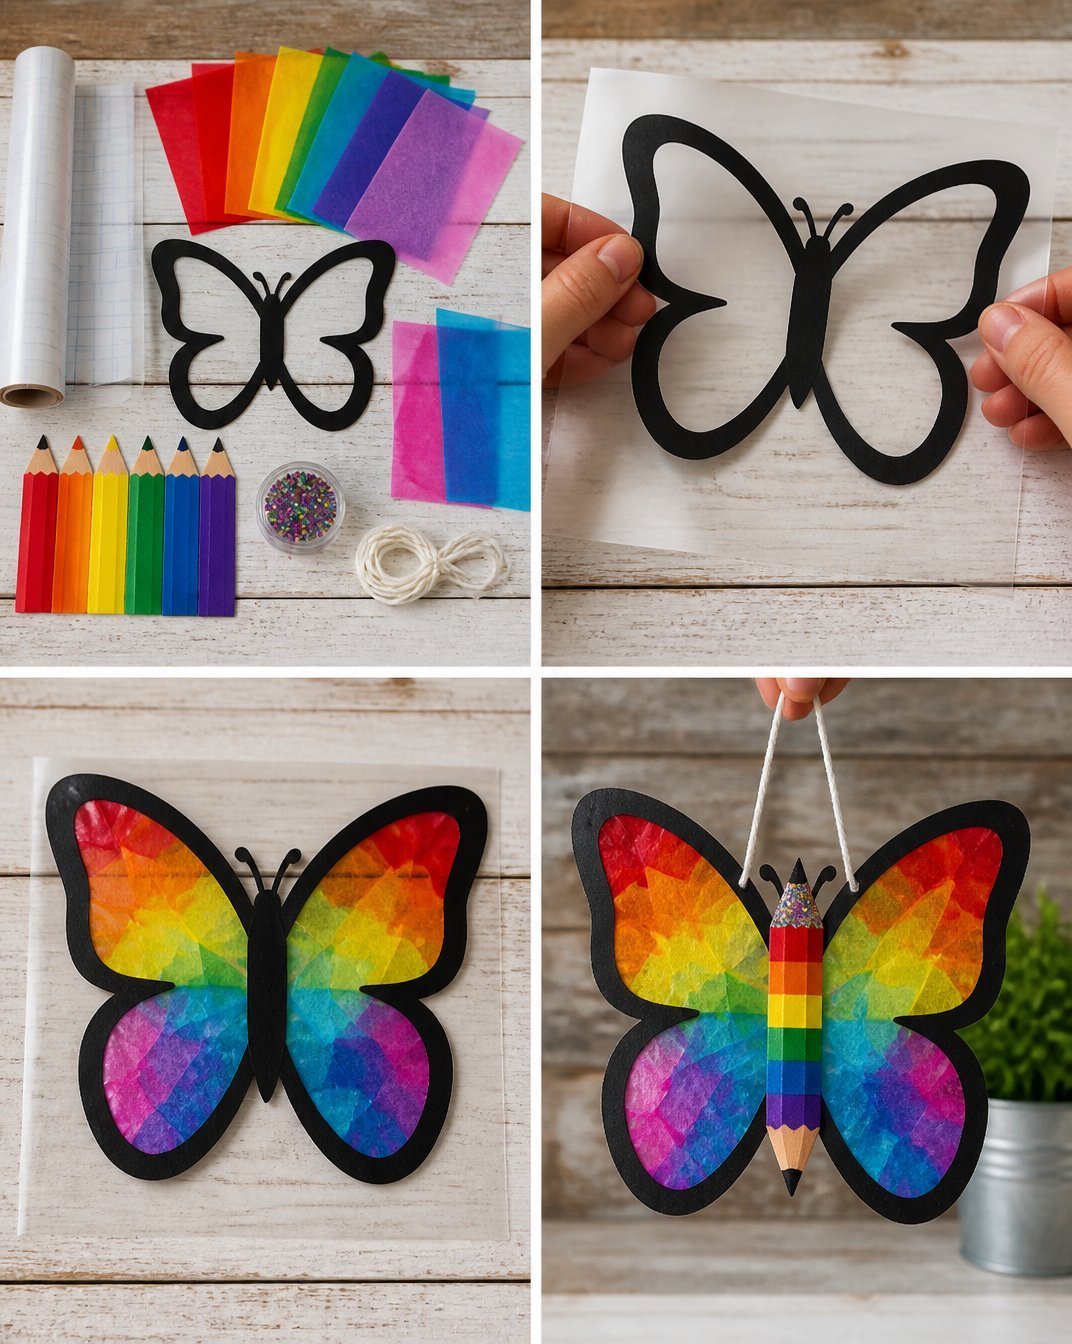
Gather the following supplies to bring your butterfly suncatcher to life:
- Clear contact paper
- Black cardstock
- Pencil-shaped paper strips
- Rainbow tissue paper
- Clear pink cellophane
- Clear blue cellophane
- Glitter
- String
You can explore more about creating colorful decorations by checking out other projects like the crystal rainbow butterfly tree.
Steps
Cut your butterfly outline from the black cardstock. Make sure the shape is simple for easier handling later. This will be the base that forms the outline of your beautiful butterfly suncatcher.
Prepare a piece of clear contact paper and lay the butterfly outline on it. The stickiness of the contact paper will help hold everything in place as you decorate.
Fill the wings with colorful pieces of tissue paper, clear cellophane, and glitter. Choose a variety of colors and textures for a vibrant look. The contrast the glitter adds will catch the light in exciting ways.
Assemble the butterfly body using pencil-shaped paper strips. Position them so the overall appearance remains balanced. You want to maintain the aesthetic while ensuring the suncatcher holds its form.
Seal everything with another piece of clear contact paper, cut around the edges, and hang it in a sunny spot. This will give your suncatcher a nice finish, preventing any pieces from falling out. Ensure it is completely sealed to avoid issues later on.
Look out for changes in texture as you fill the wings. Each new layer adds a unique dimension. You might also notice how the sunlight transforms colors brightening the entire piece and making it shine.
The suncatcher can catch attention wherever you place it. If you’re looking for inspiration to display your creation, consider the artistic approach of a stained glass jar that complements your butterfly theme.
What Goes Wrong and How to Fix It
Sometimes the glitter or tissue paper can create a mess. If you find that your wings do not adhere well, ensure that your clear contact paper is cleaned from dust and debris before placing your butterfly outline. If pieces of tissue paper crumble or warp, try using smaller pieces and layering them gently. The aim is to ensure that everything stays neatly in place while still being colorful.
Where to Display It
Your butterfly suncatcher can be displayed in various places on a window, in a garden, or even as part of your home decor. Hang it in a sunlit spot to allow the colors to illuminate beautifully. These captivating colors make it an eye-catching item in any room. You might consider creating a themed decor by pairing it with a rainbow butterfly jar for added cheerfulness.
Variations
You can experiment with the shapes and sizes of the butterflies. Try using different animal outlines or even abstract shapes to create unique suncatchers. You could even mix in other materials like beads or sequins to enhance the visual interest. Remember, the base method remains the same despite the variations you decide to make.
FAQs
Can I substitute materials?
Yes, feel free to use different colored papers or materials. You can even try fabric remnants to create texture.
Why didn’t my butterfly turn out well?
Sometimes, the colors might not be as vibrant as expected. This can happen if the light isn’t hitting the suncatcher properly; make sure to place it in a well-lit area.
How long does the suncatcher last?
If placed out of direct weather, these suncatchers can last for months or longer. The colors may fade slightly over time.
Can children help with this craft?
Absolutely! This craft is perfect for children. Just be sure to supervise them during the cutting stages, especially when using scissors or if small parts are involved.
How do I care for my suncatcher?
Simply dust it lightly with a cloth when needed. If it becomes dirty, a damp cloth can be used gently to clean it.
What if I want to make a larger version?
You can certainly scale up your design. Just make sure to increase the size of the materials used to avoid any disproportion.
Conclusion
Creating a First-Day Rainbow Pencil Butterfly Suncatcher is a delightful project that sparks creativity. For additional tools and materials for your crafting adventures, explore options like the VHALE Suncatchers Craft Set. You may also enjoy crafting inspirations found in the whimsical Butterfly Suncatcher project. Happy crafting!
Follow us on social for more DIY ideas & inspiration!
Butterfly Suncatcher
Would you like to save this project?
By submitting you agree to receive this project and occasional emails. Unsubscribe anytime.
Materials
Materials
- 1 sheet Clear contact paper
- 1 sheet Black cardstock
- Several strips Pencil-shaped paper strips
- Various pieces Rainbow tissue paper Different colors desired
- 1 sheet Clear pink cellophane
- 1 sheet Clear blue cellophane
- As desired tablespoon Glitter To add sparkle
- 1 length String For hanging
Directions
Preparation
- Cut your butterfly outline from the black cardstock.
- Prepare a piece of clear contact paper and lay the butterfly outline on it.
Decoration
- Fill the wings with colorful pieces of tissue paper, clear cellophane, and glitter.
- Assemble the butterfly body using pencil-shaped paper strips, maintaining balance.
Finishing Touch
- Seal everything with another piece of clear contact paper, cut around the edges.
- Hang it in a sunny spot.
Last Step: Don’t forget to leave a rating and comment below! It helps other readers find the best DIY projects — and it helps us too!