Imagine a magical moment where colors burst to life, sparkling rainbows dance in the light, and a simple branch transforms into a beautiful Crystal Rainbow Butterfly Tree. As the crystals glisten and shine, you’ll see how creativity meets science in this delightful DIY project. Families can gather around, share ideas, and create something truly special together. Let’s dive into the wonder of making your very own vibrant, colorful tree, filled with stunning butterflies that shimmer when touched by sunlight!
Why Make This Crystal Rainbow Butterfly Tree
Creating a Crystal Rainbow Butterfly Tree is not just about crafting; it’s about igniting imagination. This project brings together the wonder of nature and the excitement of science. Kids and adults alike will delight in watching the magic unfold as ordinary supplies turn into a stunning visual treat.
The vibrant colors and the sparkly texture of the crystals make this project a feast for the senses. As butterflies of every hue flutter from your branch, they can serve as a reminder of the beauty in transformation and creativity. Gathering around the table to create this stunning piece can become a cherished family memory, filled with laughter, learning, and artistic exploration. 
A Quick Look at How It Works
The Crystal Rainbow Butterfly Tree comes together through a simple yet enchanting process. By dissolving borax in hot water, we create a special solution where crystals can grow, forming lovely colorful structures. When you introduce different colors into the mix, each butterfly takes on a life of its own.
With this setup, the magic happens overnight as crystals form and bring the butterflies to life, creating a stunning centerpiece that glimmers with the light. The transformation from simple materials to a radiant tree filled with butterflies is a joy that captures the imagination of everyone involved.
Materials You Will Need
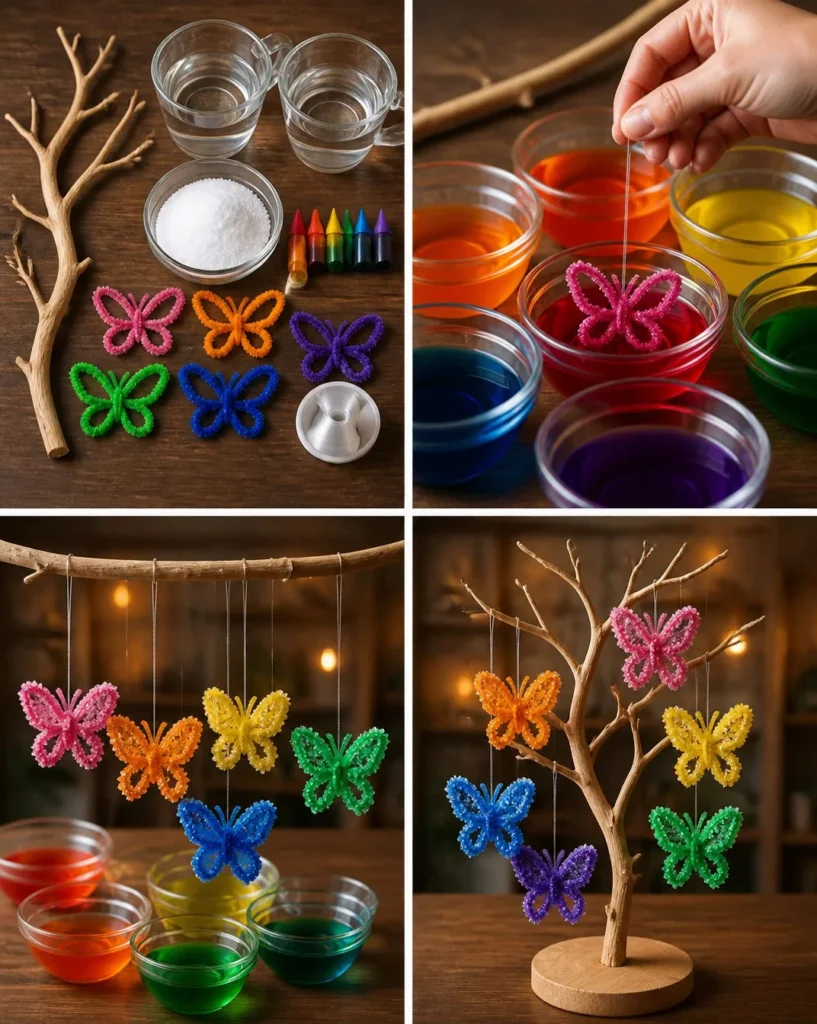
To create your own Crystal Rainbow Butterfly Tree, gather these materials:
- Small decorative branch (or a sturdy stick)
- 6 butterfly pipe-cleaner shapes (you can make them or find them pre-made)
- 2 cups hot water (be careful, as this is hot!)
- 6 tablespoons borax (this is for the crystals)
- Rainbow food coloring (to make your butterflies pop)
- Clear thread (for hanging the butterflies)
Feel free to customize the colors or substitute materials if needed. The beauty of crafting is that you can make it your own!

Step-by-Step Directions
Step-by-Step Directions
Dissolve the Borax: Divide your hot water into several containers, about one cup each, and stir in borax until dissolved. Watch as the crystals begin to disappear, creating a clear solution. Remember, use caution with the hot water; it’s best to have an adult help with this step.
Tint Each Solution: Add rainbow food coloring to each container to create a colorful array of solutions. Watch the colors swirl and mix, creating stunning hues that will delight the eye.
Suspend the Butterflies: Carefully suspend the butterfly shapes in the colored solutions. Ensure they are hanging freely in the liquid to allow the crystals to grow properly overnight.
Allow Crystals to Grow: Leave the butterflies hanging in the solutions overnight. You’ll begin to see the magic happen as crystals start to form, coating your butterflies in sparkly beauty.
Remove and Dry: Gently remove the crystalized butterflies and let them dry on a paper towel or a plate. They will sparkle and shine as they dry, revealing the amazing result of your crafting endeavor.
Display Your Creation: Once dry, take your decorative branch and hang the beautifully crystalized butterflies from it like sparkling leaves. Find a bright spot to showcase your artwork where it can catch the light and bring joy to everyone who sees it!
Displaying Your Finished Crystal Rainbow Butterfly Tree
Once you have created your magical Crystal Rainbow Butterfly Tree, showcasing it becomes a delightful task. Find a sunny windowsill where the light can reflect off the crystals, bringing out their brilliant colors. You can also hang it from the ceiling or in an entryway to greet visitors with a burst of color and creativity.
Consider using a small vase or container to hold the branch, adding decorative stones or sand to make a charming display. This project also makes a thoughtful gift! Picture giving it to a friend or family member as a symbol of creativity and joy.
Keeping Your Crystal Rainbow Butterfly Tree Looking Great
To ensure that your Crystal Rainbow Butterfly Tree stays vibrant and delightful, store it in a cool, dry place when not on display. Keep it away from moisture and direct sunlight for extended periods, as this can affect the crystals.
If you notice any dust, gently wipe it off with a soft cloth. These creations can last a long time with a little care, standing as a testament to your creativity and the magic of science.
Fun Tips and Colorful Variations
Making your Crystal Rainbow Butterfly Tree even more enchanting is a wonderful idea! Here are some friendly invitations to spark your creativity:
- Add More Colors: Try using pastel food colors for a softer look or mix shades for the butterflies. Different shades can add a unique charm to each creation.
- Try Different Shapes: Instead of butterflies, create other shapes like flowers or stars using pipe cleaners. See how the crystals form on different designs!
- Seasonal Touch: Create a winter wonderland theme using frosty colors, or make fall shapes in warm hues to celebrate the seasons.
- Play with Size: Make larger butterfly shapes for a bigger impact or smaller ones for a delicate look.
By experimenting with these ideas, you can truly make this project your own and explore a world of creativity.

FAQs About Crystal Rainbow Butterfly Tree
Will it work?
Yes! As long as you dissolve the borax completely, the crystals will form beautifully overnight. Watching this transformation is part of the fun.
Is it safe for kids?
While the materials are non-toxic, borax can be irritating if ingested or if it gets in the eyes. It’s important to supervise children, especially during the steps involving hot water and borax.
How long does it take?
You’ll need to set aside some time for preparation, but the main waiting time is overnight as the crystals grow. It’s a great opportunity to look forward to the next morning’s reveal!
Why didn’t mine turn out?
Sometimes the borax might not dissolve properly or the butterflies may touch the sides of the container. Ensure they hang freely and that the solution is well mixed.
A Little Note Before You Go
Creating your Crystal Rainbow Butterfly Tree is a delightful journey filled with color, creativity, and a bit of science magic. Enjoy every step of the process from gathering materials to watching those crystals take shape. Don’t be afraid to experiment and make this project your own. Each butterfly can tell a story of wonder, and each tree can become a symbol of your family’s creativity. Take a moment to appreciate the joy of crafting together, and let the magic you make shine brightly in your home!
Follow us on social for more DIY ideas & inspiration!
Crystal Rainbow Butterfly Tree
Would you like to save this project?
By submitting you agree to receive this project and occasional emails. Unsubscribe anytime.
Materials
Main Materials
- 1 piece Small decorative branch (or a sturdy stick)
- 6 pieces Butterfly pipe-cleaner shapes Can be made or purchased pre-made
- 2 cups Hot water Exercise caution, as this is hot!
- 6 tablespoons Borax This is for the crystals
- as needed Rainbow food coloring To make the butterflies pop
- as needed Clear thread For hanging the butterflies
Directions
Preparation
- Dissolve the Borax: Divide your hot water into several containers, about one cup each, and stir in borax until dissolved. Watch as the crystals begin to disappear, creating a clear solution.
- Tint Each Solution: Add rainbow food coloring to each container to create a colorful array of solutions. Watch the colors swirl and mix.
- Suspend the Butterflies: Carefully suspend the butterfly shapes in the colored solutions to allow the crystals to grow overnight.
Crystallization
- Allow Crystals to Grow: Leave the butterflies hanging in the solutions overnight.
- Remove and Dry: Gently remove the crystalized butterflies and let them dry on a paper towel or a plate.
- Display Your Creation: Once dry, take your decorative branch and hang the beautifully crystalized butterflies from it.
Last Step: Don’t forget to leave a rating and comment below! It helps other readers find the best DIY projects — and it helps us too!