Rainbow Panda Pencil Cup
Creating a Rainbow Panda Pencil Cup transforms an ordinary plastic bottle into a lively and colorful desk accessory. This project showcases the impact of simple materials when combined thoughtfully. As you work through each step, you will witness how the colors and textures come together for a delightful result. You may also find Adorable Diy Easter Bunny Cups useful.
To start on this crafting journey, gather the following materials: a rinsed and dried plastic bottle, white cardstock or paint, black foam, rainbow yarn, pink or blue gems, and glue. You may also find Baking Soda Rainbow Crystal Forest Rainbow Crystals useful.
What Makes This Work
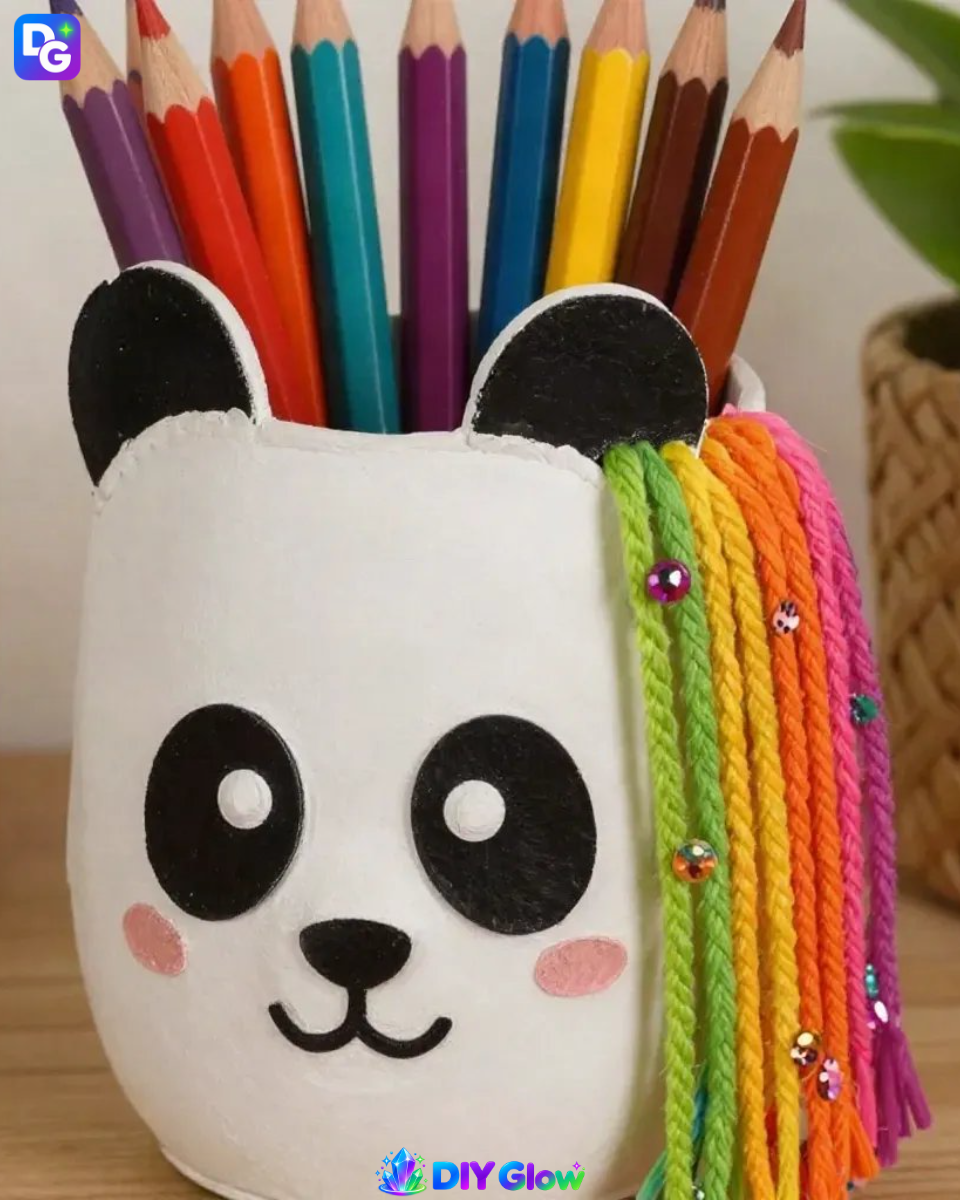
The transformation from a plain plastic bottle to a Rainbow Panda Pencil Cup is all about creativity and the effectiveness of bright colors. The contrast between the black foam used for the panda’s features and the vibrant yarn creates a striking visual effect. Incorporating gems adds a touch of sparkle that truly brings your creation to life. If you’re interested in exploring more colorful crafts, check out this guide on broken crayons and glowing flowers.
Materials
- Plastic bottle
- White cardstock or paint
- Black foam
- Rainbow yarn
- Pink or blue gems
- Glue
You may also find Baking Soda Rainbow Crystal Forest useful.
Steps
Rinse and Prepare the Bottle: Begin by rinsing and drying the plastic bottle thoroughly. This ensures that any residue is removed. You can cut the bottle to your desired height or choose to cover it with white cardstock or paint for a cleaner look.
Create the Panda Face: Cut out specific shapes from the black foam to craft the panda face. This includes circles for the ears and nose. For the eyes, use cardstock to create a striking contrast. Assemble these features and securely glue them onto the bottle. Pay attention to alignment to ensure they are centered.
Add a Rainbow Mane: Using colorful yarn, create a lively mane around the panda’s head. This yarn will add a pop of color and texture, making your cup instantly eye-catching. Ensure it covers the rim of the bottle effectively to transition nicely to the panda features.
Embellish with Gems: Take the pink or blue gems and glue them onto the panda’s body or around the rim of the cup. This step is about creating a fun, decorative aspect let your creativity guide where to place them.
Final Touch and Usage: Allow everything to dry completely. Once the glue has set, fill the cup with your favorite pencils to elevate your workspace or give it as a unique gift.
What Goes Wrong and How to Fix It
Sometimes, items like foam may not adhere well if the surface of the bottle is wet or oily. Ensure your bottle is completely dry before gluing anything. If you find that the yarn is coming loose, a bit more glue can help reinforce those areas. For any gems that don’t stick, simply reapply glue and allow it to dry fully before handling.
Where to Display It
The Rainbow Panda Pencil Cup can brighten up any desk, whether at home or in a classroom. Consider placing it on your study desk or a cozy craft corner. It also makes a cheerful addition to a child’s room, promoting organization in a fun way. If you’re looking for more display ideas, you might enjoy this butterfly garden decor project.

Variations
For a twist, try changing the colors of the panda features or using different sizes of bottles to create a panda family. Experiment with different embellishments, such as stickers or even fabric scraps for a unique touch. You can make several and arrange them on a shelf or desk to create a lively scene.
FAQs
Can I use any type of bottle for this craft?
Yes, you can use different types of plastic bottles. Just make sure they are cleaned and dried.
What if I don’t have black foam?
If you don’t have black foam, you can use black construction paper instead. It will still give a great look.
How long will this cup last?
As long as it is handled carefully, your Rainbow Panda Pencil Cup can last for years. Remind users not to submerge it in water.
Can children help with this project?
Definitely! Kids can help with gluing and selecting the yarn colors. Just ensure they are supervised during any cutting steps.
How can I clean it once it’s made?
Use a damp cloth to wipe down the outside. Avoid soaking it in water, as this may loosen the glue.
What if my gems don’t stick?
If the gems are not sticking, try using a stronger adhesive or giving the glue more time to set.
Conclusion
Crafting a Rainbow Panda Pencil Cup is an enjoyable and creative way to bring color to your desk. For additional colorful options, consider the Barn Pencil Holder for another fun project. If you need more variety, check out these building block pencil holders that offer a playful way to organize your workspace.
Follow us on social for more DIY ideas & inspiration!
Rainbow Panda Pencil Cup
Would you like to save this project?
By submitting you agree to receive this project and occasional emails. Unsubscribe anytime.
Materials
Craft Materials
- 1 piece Plastic bottle Rinsed and dried
- 1 piece White cardstock or paint For coating the bottle
- 1 sheet Black foam For panda features
- 1 skein Rainbow yarn For the panda mane
- 5 pieces Pink or blue gems For decoration
- 1 bottle Glue For assembly
Directions
Preparation
- Begin by rinsing and drying the plastic bottle thoroughly. This ensures that any residue is removed. You can cut the bottle to your desired height or choose to cover it with white cardstock or paint for a cleaner look.
Creating the Panda Face
- Cut out specific shapes from the black foam to craft the panda face, including circles for the ears and nose. Use cardstock to create eyes for a striking contrast. Assemble these features and securely glue them onto the bottle.
Adding the Rainbow Mane
- Using colorful yarn, create a lively mane around the panda's head, ensuring it effectively covers the rim of the bottle to transition nicely to the panda features.
Embellishing with Gems
- Take the pink or blue gems and glue them onto the panda's body or around the rim of the cup, letting your creativity guide the placement.
Final Touch and Usage
- Allow everything to dry completely. Once the glue has set, fill the cup with your favorite pencils to elevate your workspace or give it as a unique gift.
Last Step: Don’t forget to leave a rating and comment below! It helps other readers find the best DIY projects — and it helps us too!