I set a small bowl on the table and let the late light pool across its rim. The tiny pink crystals, shaped like seashells, caught the light and held it like a quiet song. I cupped one in my palm and felt its cool, smooth face give a whisper of weight. Making Pink Seashell Crystals slows my hands and sharpens my breathing in a very small, kind way. If you enjoy translucent, delicate projects you can hang in a window, you may like to make your own pink bioplastic suncatchers sometime; the simple rhythms feel familiar and warm.
Why Pink Seashell Crystals Feels Comforting to Create

There is a quiet comfort in shaping something small and luminous. Pink Seashell Crystals invite slow movement. You press, you pour, you wait, and for a moment the world reduces to texture and light. The pastel color soothes the eyes. The shell shapes suggest shoreline memories without needing to be perfect.
Working with these materials reduces decision fatigue. You choose a hue and a mold, and the rest is cadence and patience. The repetitive motions measuring powder into a bowl, stirring until the mixture glosses, tapping the mold to ease air bubbles all become a kind of gentle meditation. These small, tactile rituals calm the nervous system in a way my loud projects never do.
I find that the finished pieces hold that calm. They shimmer on a shelf or dangle in a window, moving slowly with any draft. They create a tiny, steady pleasure each time I pass by. If you want to explore similar sensory crafts that bring scent or shimmer into a room, my post on aromatic gems offers a gentle companion practice focused on scent and touch.
A Gentle Look at the Process
The process moves like a soft tide. First you gather powders, liquid, and molds. Then you mix until the texture turns from dry to glossy. You pour, you settle, and you listen for the tiny pop of escaping bubbles. You watch as the mixture cools and holds its new shape.
Movement matters here. Stir with a spoon that feels steady in your hand. Pour slowly and let the rim of the mold catch the flow. Tap lightly when you need to coax air bubbles out. The sounds are wafer-thin: soft clinks, a faint scrape, the hush of drying. Those sounds keep you present without demanding speed.
I often set a cup of tea nearby and take small sips between steps. That pause gives my hands and my eyes a rest, and keeps the rhythm unhurried. If you prefer another slow project while you wait for cures, you might enjoy a tutorial to make your own pink bioplastic suncatchers at home later on; it shares a similar pace and a lovely translucent finish.
Materials You’ll Need
- Clear casting resin or a low-heat melting crystal medium (choose one you know and trust; clear resin gives glass-like clarity)
- Pink mica powder or pastel pigment (easy to blend; start with a small amount)
- Small seashell-shaped silicone molds (flexible for easy release)
- Mixing cups and wooden stir sticks (disposable or dedicated to crafts)
- Disposable gloves (protect your skin; essential for resin)
- Fine-point syringe or a small pouring spout (helps with detailed fills)
- A toothpick or pin for coaxing bubbles (gentle tools work best)
- A mask rated for organic vapors if using resin (safety first)
- A heat gun or small torch, optional (for removing surface bubbles)
- A soft cloth and mild soap (cleaning spills)
- String, ribbon, or small eye pins for hanging (optional)
- Small tray or cardboard to protect your work surface (substitute-friendly)
I keep my materials in a shallow box so I can carry them to a sunny window. The silicone molds come in many shapes; shell molds work best when they have a gentle curve and thin walls. I prefer mica powders because they migrate with the mix and create soft, pearly finishes that catch light without glittering too hard.
Step-by-Step Directions

- Clear and calm your space. Lay down a tray or cardboard and gather all your supplies within reach. Put on gloves and your mask. Breathe slowly once, in and out.
- Measure the resin or crystal medium per the product instructions into a mixing cup. Keep the parts accurate; resin needs precise ratios to cure clearly. Stir with a steady hand until the mix turns glossy and uniform.
- Add a pinch of pink mica powder. Start small. Fold the color in slowly so you can watch the hue bloom. Aim for a soft wash of color rather than an intense paste.
- Let the mix rest for a minute. Small bubbles will rise to the surface. Use a toothpick to coax stubborn bubbles toward the edge, or hold the mix high and pour slowly to minimize trapped air.
- Prepare your molds. Place them on a flat tray. If you plan to make hanging crystals, thread a tiny eye pin or loop into each mold first so it sits where you want the hole to be.
- Pour the mixture into each shell mold with a gentle, steady stream. Fill to the rim and let the mixture settle. You will feel the weight as the resin finds its shape. Tap the tray softly to encourage bubbles to surface.
- Use a small torch or heat gun briefly across the tops to smooth the surface and reduce bubbles. Keep the flame moving and at a distance to avoid overheating. If you do not use a torch, a slow breath or the tip of a heated toothpick works too.
- Cover the molds to shield from dust. Place the tray somewhere level and undisturbed. Let the pieces cure for the amount of time the product recommends. The wait is part of the craft.
- Unmold slowly. Flex the silicone and let the edges release first. If any pieces resist, turn them over and press from the back rather than forcing the front.
- Lightly sand the edges if they feel sharp, using fine-grit sandpaper. Rinse the pieces and pat them dry with a soft cloth. The shells should feel smooth and cool in your hand.
- Add hanging hardware or a small dab of clear glue to attach ribbon. If you want a subtle shimmer, brush on a thin coat of clear varnish mixed with a whisper of mica.
- Arrange on a shelf or hang in a window where a soft breeze can make them sing. Take a moment and notice how the light warms the pink color.
Bringing Pink Seashell Crystals Into Your Space
Pink Seashell Crystals fit naturally into quiet corners. I like to hang a trio from a narrow window and let the light pool at noon. They cast soft rosy shadows on the sill and feel like a small, private sea.
You can nest a few in a shallow dish with smooth pebbles. Touch them sometimes. Their cool surface feels like a memory of water. If you have a reading nook, place one near the lamp so it glows when you read in the evening.
I once threaded several onto thin ribbon and used them as gentle drawer pulls on a linen chest. They added a small tactile joy every time I opened the drawer. If you keep houseplants, a single shell tucked into a pot can catch morning light and lift the arrangement.
For seasonal practice, bring them out with softer textiles in late winter. Lay them on a folded shawl or a knit blanket. Their presence asks you to slow and to notice small bright things without hurry. If you like botanical pairings, I wrote about growing crystal pink hearts which complement these pieces beautifully in both color and calm.
Making This DIY Last
Treat your Pink Seashell Crystals gently. Resin can yellow slightly over many years if exposed to direct sun constantly. Rotate their display occasionally to let different pieces meet the light.

Store them in a small padded box when not on display. Wrap each shell in soft tissue or a bit of flannel so they do not knock together. Avoid stacking heavy items on top of them.
If a piece collects dust, rinse with warm water and a soft cloth. Avoid harsh cleaners or scrubbing that could dull the surface. If you notice a faint cloudy patch, a careful polish with a microfiber cloth and a little resin-safe polish can restore the sheen.
Resin can chip if dropped. If an edge chips, you can sand it smooth and then seal with a thin layer of gloss. Keep the project out of reach of small children and pets until fully cured, and always follow the safety recommendations for the material you use.
What I’ve Learned While Making This
I learned that the small choices feel most meaningful. A tiny pinch of mica can change the mood of a piece. A steady pour beats a hurried one every time. I learned that perfect clarity often requires patient degassing and a careful hand, but imperfect surfaces hold a kind of honesty that I grew to love.
I also learned to respect the materials. Clear resins can seem forgiving, but they demand accurate measuring and proper ventilation. Silicone molds last longer when you clean them gently and avoid sharp tools. Keeping a dedicated set of tools for resin saved many small confusions in my studio.
Another lesson: the waiting holds value. People often rush to see the final thing. I now sit with the curing tray for a moment and watch light move across it. That quiet time deepens the connection to the object and slows the mind.
If you want to pair this project with other gentle crafts, the rhythm of making works well alongside slow paper folding, bead stringing, or a mindful stitch. For a slightly different material play, my guide on make your own pink bioplastic suncatchers explores another way to work with light and color while keeping the pace calm.
Gentle Tips & Variations
- Invite texture. Mix a tiny amount of crushed shell or mica flakes into part of your batch to make a piece with subtle depth. The small bits catch light differently and make each shell feel unique.
- Make tiny clusters. Instead of individual shells, cast several small shapes together in a shallow mold. They look like a pocket of sea glass and feel lovely to nestle in a hand.
- Layer colors. Pour one pale pink, let it firm slightly, then add another thin veil of deeper pink. The layers create soft gradients much like a sunrise.
- Use natural string for hanging. Linen or cotton thread warms the piece and keeps the focus on texture rather than shine.
- Try a scent memory. Place a tiny dab of a safe, resin-compatible scented oil in the box where you store the shells so they carry an association with a calming aroma when you reach for them.
These are invitations. Choose one. Skip one. The project rewards small, mindful experiments.
FAQs About Pink Seashell Crystals
Are these crystals safe to handle once cured?
Can I make these without resin?
How do I avoid bubbles in the finished piece?
Can I wash these in water?
Is the pink permanent?
A Gentle Note Before You Go
When you finish a small piece, take a moment to hold it against your palm and feel the cool curve of the shell. Notice how the light changes as you move. These tiny objects hold a little fragment of the making process. They remind you that calm can exist in small, looked-after things.
If you keep a few objects like this around, they make a quiet collection of small victories. They teach patience without lecturing. They sit on shelves and windowsills and ask you, quietly, to slow with them.
Conclusion
If you enjoy wearing a statement that speaks quietly, the playful design of the Crystal Pink Seashell Bikini Shirt – A-Morir echoes the same seashell inspiration with a bold fashion voice. For a pocket-sized luxury that twinkles in evening light, the Powder Satin Shell Clutch Bag Swarovski Crystals – Lulu Guinness pairs a pearly shell motif with sparkling detail and can inspire how you display small sparkling crafts at home.
Take slow steps with your Pink Seashell Crystals. Let each piece be a pause. Let the making sit lightly in your day, and let the finished items bring small, steady comfort.
Follow us on social for more DIY ideas & inspiration!
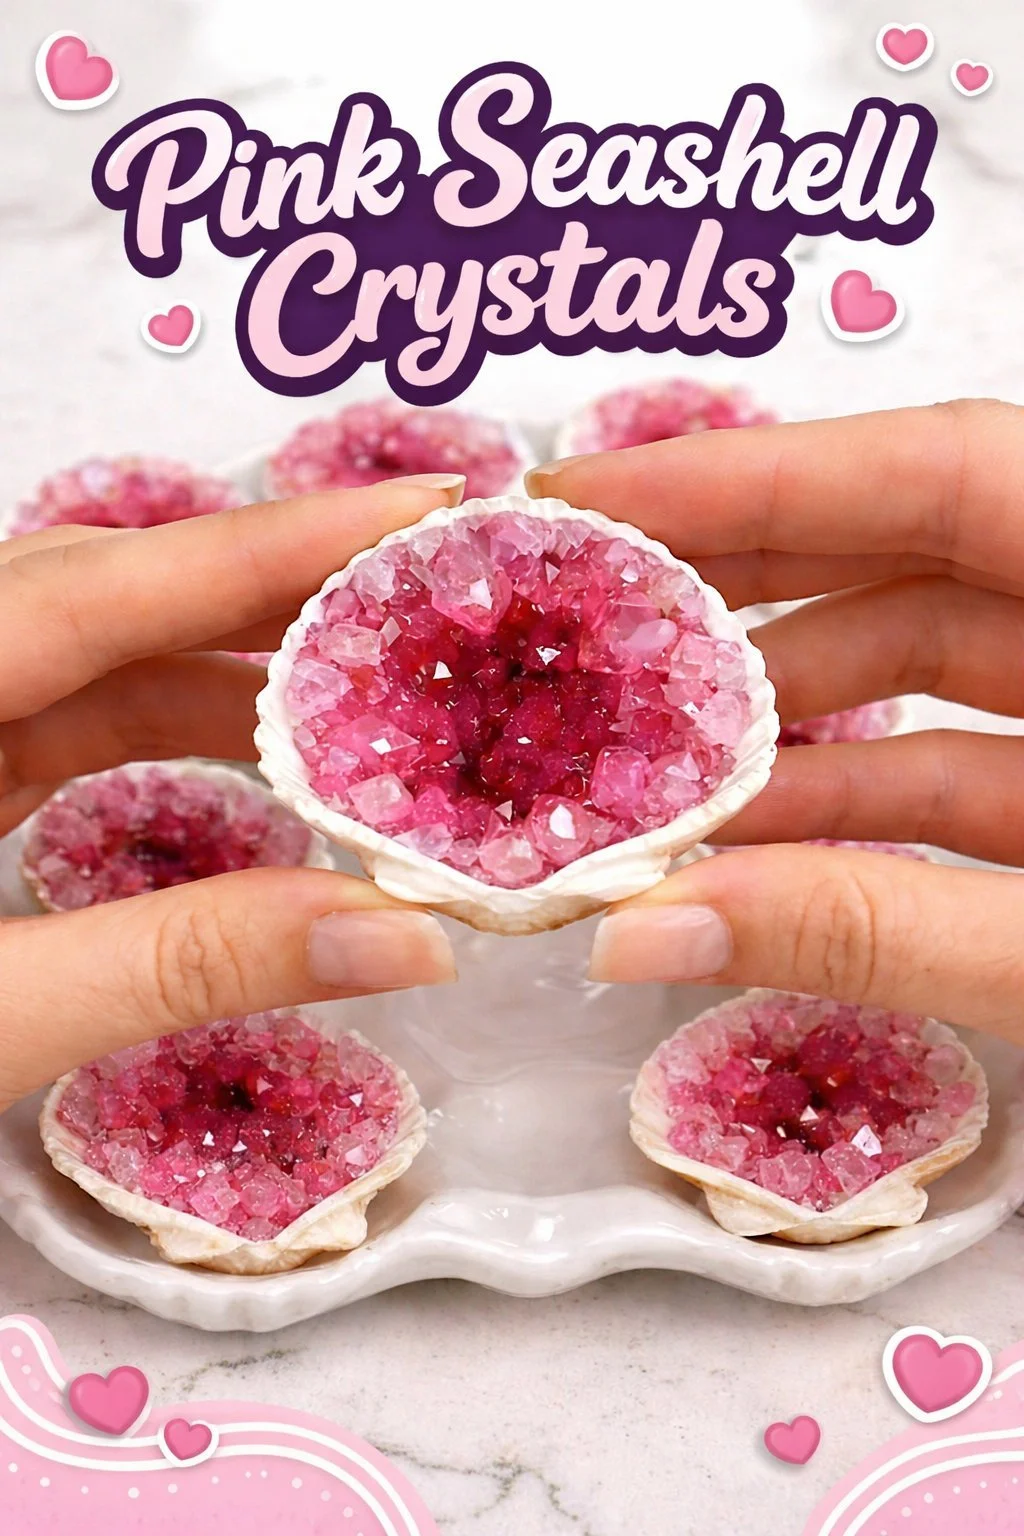
Pink Seashell Crystals
Would you like to save this project?
By submitting you agree to receive this project and occasional emails. Unsubscribe anytime.
Materials
- Clear casting resin or a low-heat melting crystal medium (choose one you know and trust; clear resin gives glass-like clarity)
- Pink mica powder or pastel pigment (easy to blend; start with a small amount)
- Small seashell-shaped silicone molds (flexible for easy release)
- Mixing cups and wooden stir sticks (disposable or dedicated to crafts)
- Disposable gloves (protect your skin; essential for resin)
- Fine-point syringe or a small pouring spout (helps with detailed fills)
- A toothpick or pin for coaxing bubbles (gentle tools work best)
- A mask rated for organic vapors if using resin (safety first)
- A heat gun or small torch, optional (for removing surface bubbles)
- A soft cloth and mild soap (cleaning spills)
- String, ribbon, or small eye pins for hanging (optional)
- Small tray or cardboard to protect your work surface (substitute-friendly)
Directions
- Clear and calm your space. Lay down a tray or cardboard and gather all your supplies within reach. Put on gloves and your mask. Breathe slowly once, in and out.
- Measure the resin or crystal medium per the product instructions into a mixing cup. Keep the parts accurate; resin needs precise ratios to cure clearly. Stir with a steady hand until the mix turns glossy and uniform.
- Add a pinch of pink mica powder. Start small. Fold the color in slowly so you can watch the hue bloom. Aim for a soft wash of color rather than an intense paste.
- Let the mix rest for a minute. Small bubbles will rise to the surface. Use a toothpick to coax stubborn bubbles toward the edge, or hold the mix high and pour slowly to minimize trapped air.
- Prepare your molds. Place them on a flat tray. If you plan to make hanging crystals, thread a tiny eye pin or loop into each mold first so it sits where you want the hole to be.
- Pour the mixture into each shell mold with a gentle, steady stream. Fill to the rim and let the mixture settle. You will feel the weight as the resin finds its shape. Tap the tray softly to encourage bubbles to surface.
- Use a small torch or heat gun briefly across the tops to smooth the surface and reduce bubbles. Keep the flame moving and at a distance to avoid overheating. If you do not use a torch, a slow breath or the tip of a heated toothpick works too.
- Cover the molds to shield from dust. Place the tray somewhere level and undisturbed. Let the pieces cure for the amount of time the product recommends. The wait is part of the craft.
- Unmold slowly. Flex the silicone and let the edges release first. If any pieces resist, turn them over and press from the back rather than forcing the front.
- Lightly sand the edges if they feel sharp, using fine-grit sandpaper. Rinse the pieces and pat them dry with a soft cloth. The shells should feel smooth and cool in your hand.
- Add hanging hardware or a small dab of clear glue to attach ribbon. If you want a subtle shimmer, brush on a thin coat of clear varnish mixed with a whisper of mica.
- Arrange on a shelf or hang in a window where a soft breeze can make them sing. Take a moment and notice how the light warms the pink color.
Last Step: Don’t forget to leave a rating and comment below! It helps other readers find the best DIY projects — and it helps us too!